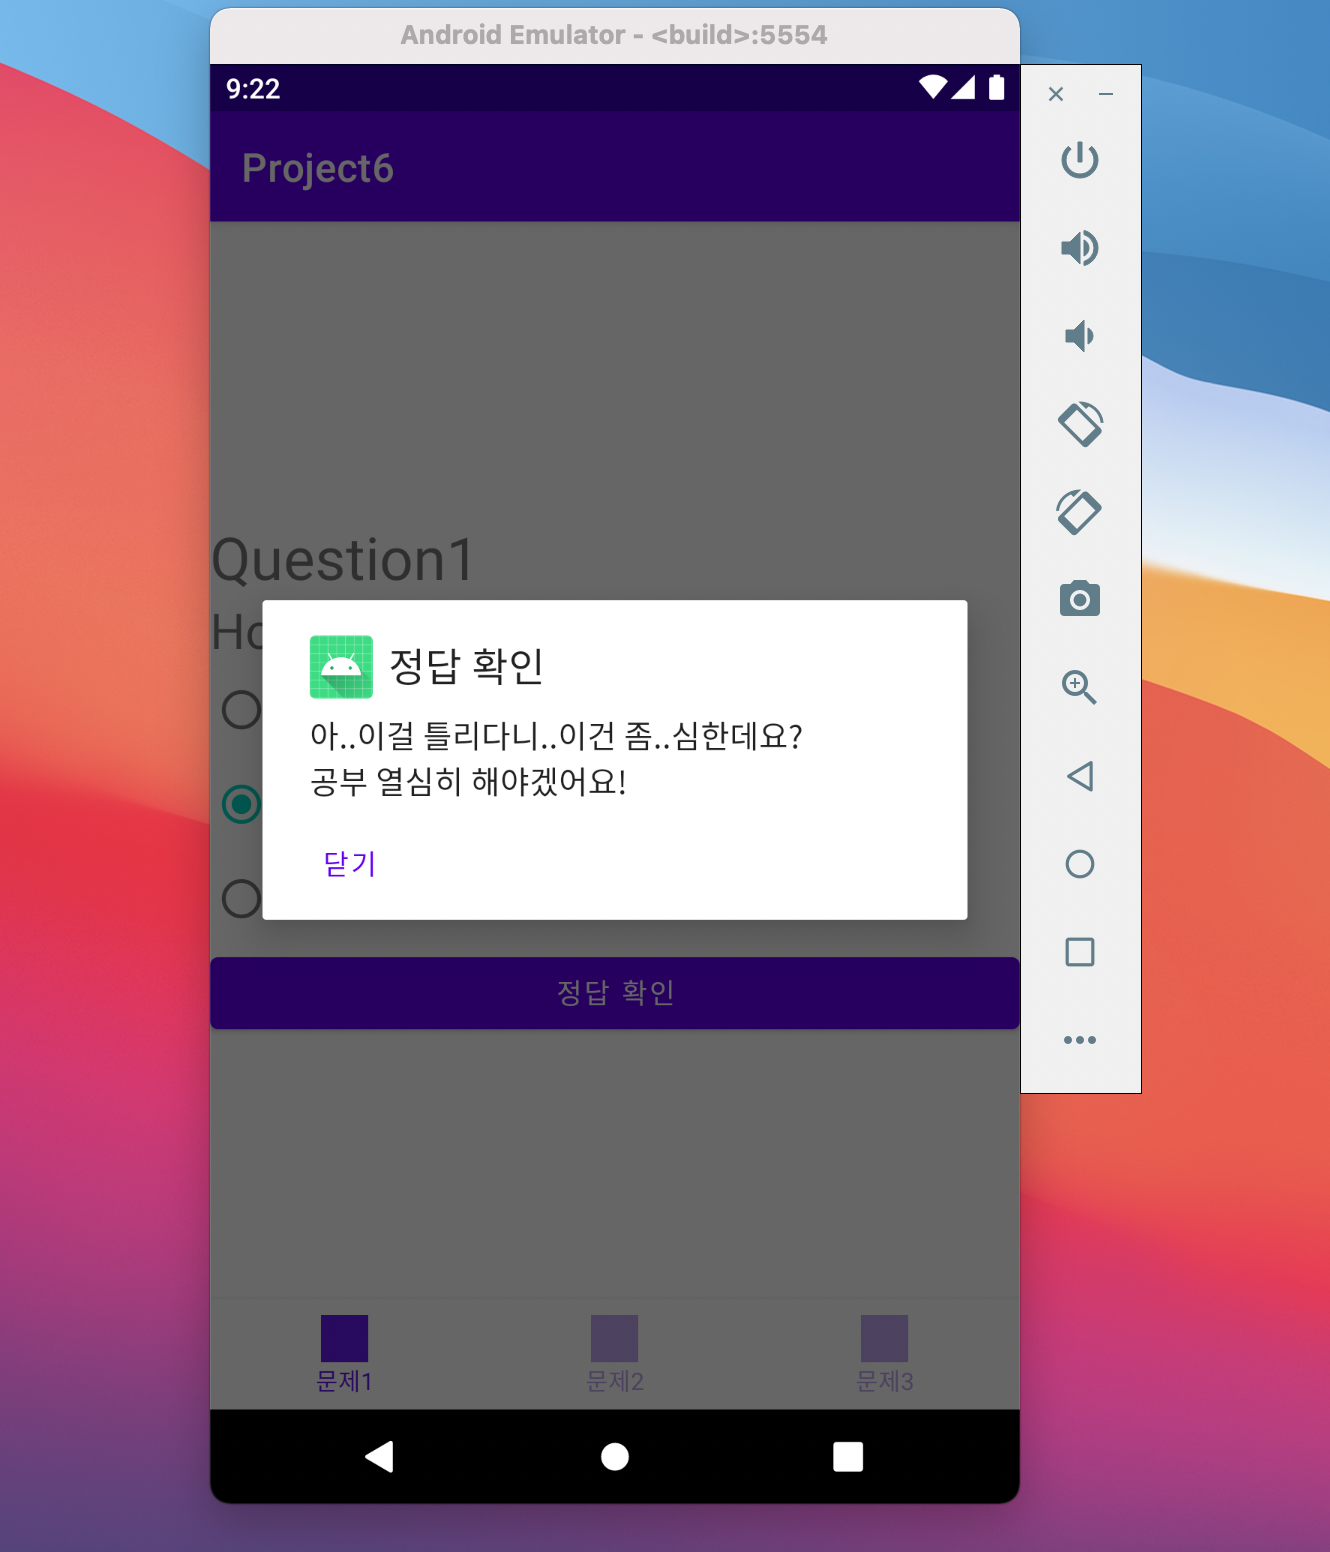
프로젝트: 문제 풀기 앱
프로젝트 설명:
1. 하단에 탭 3개
2. 각 탭마다 문제가 있음
3. 답안은 라디오 버튼으로 설정
4. 정답 확인 버튼 누르면 맞으면 맞았다는 알림 창을, 틀리면 틀렸다는 알림창을 뜨게 함.
결과물


menu_main2 : 하단 탭 텍스트와 아이콘 설정
res> 마우스 오른쪽 버튼 > New > Directory -> 이름은 menu로 설정
menu > 마우스 오른쪽 버튼 > New > Menu Resource File -> 이름 menu_main2.xml
(menu_main2인 이유는 사실 이 문제집 프로젝트에 접속하려면, 회원가입과 로그인 후, 접속할 수 있는 형식으로 만들었는데 , 그 과정 중 menu_main을 이미 썼습니다. 앞 과정은 너무 길어서 잘랐습니다!)
res> menu> menu_main2.xml
<?xml version="1.0" encoding="utf-8"?>
<menu xmlns:android="http://schemas.android.com/apk/res/android"
    xmlns:app="http://schemas.android.com/apk/res-auto">

//drawable에 자신이 원하는 이미지 다운후 icon으로 넣어줘도 됩니다.
//아이콘 이미지 없는 경우 android:icon="@drawable/파일명"  생략가능.

   <item
        android:id="@+id/question1"
        android:enabled="true"
        android:title="문제1"
        android:textSize="30sp"
        android:icon="@drawable/common1"
        app:showAsAction="ifRoom"/>  //ifRoom:액션바에 공간이 있을 경우 표시

    <item
        android:id="@+id/question2"
        android:enabled="true"
        android:title="문제2"
        android:textSize="30sp"
        android:icon="@drawable/common2"
        app:showAsAction="ifRoom"/>

    <item
        android:id="@+id/question3"
        android:enabled="true"
        android:title="문제3"
        android:textSize="30sp"
        android:icon="@drawable/common3"
        app:showAsAction="ifRoom"/>


</menu>
Mainactivity.java & activity_main.xml
Mainactivity.java
package org.techtown.project6;

import androidx.annotation.NonNull;
import androidx.appcompat.app.AppCompatActivity;

import android.os.Bundle;
import android.view.MenuItem;

import com.google.android.material.bottomnavigation.BottomNavigationView;

//프래그 먼트 생성
public class MainActivity extends AppCompatActivity {
    Ex01Fragment ex01Fragment;
    Ex02Fragment ex02Fragment;
    Ex03Fragment ex03Fragment;

    @Override
    protected void onCreate(Bundle savedInstanceState) {
        super.onCreate(savedInstanceState);
        setContentView(R.layout.activity_main2);
        ex01Fragment=new Ex01Fragment();
        ex02Fragment=new Ex02Fragment();
        ex03Fragment=new Ex03Fragment();


//첫 화면은 ex01Fragment로 설정

        getSupportFragmentManager().beginTransaction().replace(R.id.container,ex01Fragment).commit();

//하단탭 설정
        BottomNavigationView bottomNavigationView=findViewById(R.id.bottom);
        bottomNavigationView.setOnNavigationItemSelectedListener(new BottomNavigationView.OnNavigationItemSelectedListener() {
            @Override
            public boolean onNavigationItemSelected(@NonNull MenuItem item) {

                switch (item.getItemId()){   //menu_main2에 있는 item들 id 값 받아오기
                    case R.id.question1:   //id가 question1인 탭 터치 할 경우 ex01fragment를 불러옴
                        getSupportFragmentManager().beginTransaction().replace(R.id.container,ex01Fragment).commit();


                        return true;
                    case R.id.question2:    //id가 question2인 탭 터치 할 경우 ex02fragment를 불러옴
                        getSupportFragmentManager().beginTransaction().replace(R.id.container,ex02Fragment).commit();


                        return true;
                    case R.id.question3:   //id가 question3인 탭 터치 할 경우 ex03fragment를 불러옴
                        getSupportFragmentManager().beginTransaction().replace(R.id.container,ex03Fragment).commit();


                        return true;
                }
                return false;

            }
        });
    }
}
activity_main.xml > Code화면
<?xml version="1.0" encoding="utf-8"?>
<androidx.constraintlayout.widget.ConstraintLayout xmlns:android="http://schemas.android.com/apk/res/android"
    xmlns:app="http://schemas.android.com/apk/res-auto"
    xmlns:tools="http://schemas.android.com/tools"
    android:layout_width="match_parent"
    android:layout_height="match_parent"
    tools:context=".MainActivity">

    <FrameLayout
        android:id="@+id/container"
        android:layout_width="match_parent"
        android:layout_height="match_parent">

    </FrameLayout>

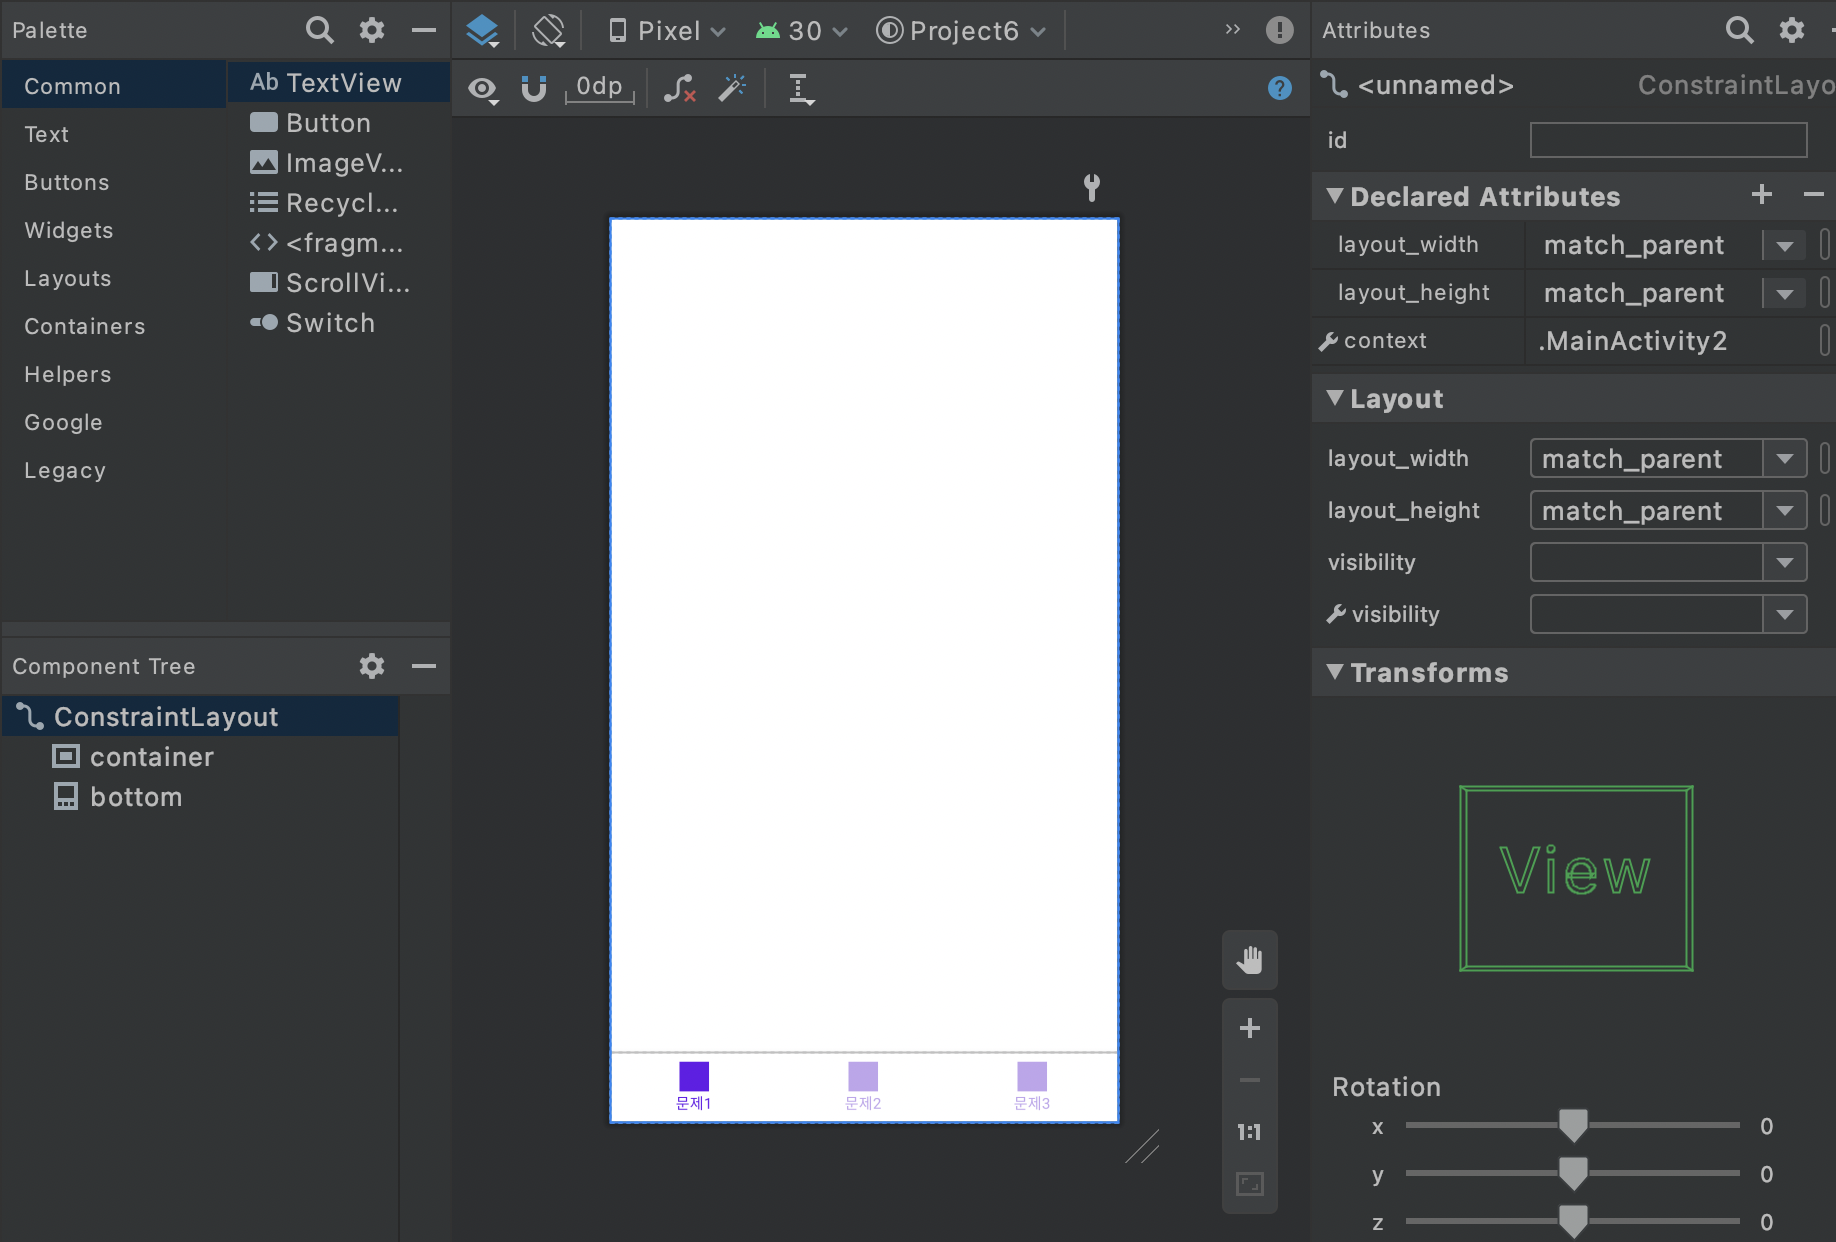
    <com.google.android.material.bottomnavigation.BottomNavigationView
        android:id="@+id/bottom"
        android:layout_width="match_parent"
        android:layout_height="wrap_content"
        app:itemIconTint="@drawable/item_color"  //drawable 에서 색깔 직접 지정함
        app:itemTextColor="@drawable/item_color"  ////drawable 에서 색깔 직접 지정함.(아래참고)
        app:layout_constraintBottom_toBottomOf="parent"
        app:layout_constraintEnd_toEndOf="parent"
        app:menu="@menu/menu_main2" />

</androidx.constraintlayout.widget.ConstraintLayout>
activity_main.xml > Design화면

res> drawable> New> drawable Resource File -> 이름: item_color.xml
drawable> item_color.xml
item_color.xml
<?xml version="1.0" encoding="utf-8"?>
<selector xmlns:android="http://schemas.android.com/apk/res/android">
    <item
        android:color="#651AEA" android:state_checked="true"/>   //탭 클릭했을때 색깔
    <item
        android:color="#BFA5ED"/>  //클릭 안했을때 색깔

</selector>
Ex01 Fragment.java & fragment_ex01.xml
아래 fragment1,2,3은 라디오 버튼 답안 다른 거 빼고는 다 똑같습니다.
Ex01 Fragment.java
package org.techtown.project6;

import android.app.AlertDialog;
import android.os.Bundle;

import androidx.fragment.app.Fragment;

import android.view.LayoutInflater;
import android.view.View;
import android.view.ViewGroup;
import android.widget.Button;
import android.widget.RadioButton;
import android.widget.RadioGroup;


public class Ex01Fragment extends Fragment {

    @Override
    public View onCreateView(LayoutInflater inflater, ViewGroup container,
                             Bundle savedInstanceState) {
        ViewGroup rootView=(ViewGroup)inflater.inflate(R.layout.fragment_ex01,container,false);

//라디오 그룹으로 꼭 라디오 버튼들 묶어 줘야됨!!
        RadioGroup radioGroup=rootView.findViewById(R.id.radiogroup);
        RadioButton radioButton=rootView.findViewById(R.id.radioButton);
        RadioButton radioButton2=rootView.findViewById(R.id.radioButton2);
        RadioButton radioButton3=rootView.findViewById(R.id.radioButton3);

        Button button3=rootView.findViewById(R.id.button3);
        button3.setOnClickListener(new View.OnClickListener() {
            @Override
            public void onClick(View v) {
                boolean ex1=radioButton3.isChecked();
                if(ex1==true){
                //dialog, 알림창 설정
                    AlertDialog.Builder dialog=new AlertDialog.Builder(getActivity());
                    dialog.setTitle("정답 확인");
                    dialog.setMessage("축하합니다! 맞았습니다! 다음 문제에 도전하세요!");
                    dialog.setIcon(R.mipmap.ic_launcher);  //아이콘 설정
                    dialog.setNeutralButton("닫기",null);
                    dialog.show();
                }
                else{
                    AlertDialog.Builder dialog=new AlertDialog.Builder(getActivity());
                    dialog.setTitle("정답 확인");
                    dialog.setMessage("아..이걸 틀리다니..이건 좀..심한데요?"+"\n"+"공부 열심히 해야겠어요!");
                    dialog.setIcon(R.mipmap.ic_launcher);
                    dialog.setNeutralButton("닫기",null);
                    dialog.show();
                }
            }
        });
        return rootView;
    }

}
fragment_ex01.xml
<?xml version="1.0" encoding="utf-8"?>
<LinearLayout xmlns:android="http://schemas.android.com/apk/res/android"
xmlns:app="http://schemas.android.com/apk/res-auto"
xmlns:tools="http://schemas.android.com/tools"
android:layout_width="match_parent"
android:layout_height="match_parent"
android:orientation="vertical"
tools:context=".Ex01Fragment">
<TextView
android:id="@+id/textView3"
android:layout_width="wrap_content"
android:layout_height="wrap_content"
android:layout_marginTop="150dp"
android:text="Question1"
android:textSize="30sp" />
<TextView
android:id="@+id/textView4"
android:layout_width="match_parent"
android:layout_height="wrap_content"
android:text="How to say "강아지" in English?"
android:textSize="25sp" />
//라디오 그룹 안에 라디오 버튼이 들어가 있어야됨!
//라디오 버튼을 쓸때는 라디오 그룹을 꼭 써줘야됨!
<RadioGroup
android:id="@+id/radiogroup"
android:layout_width="match_parent"
android:layout_height="wrap_content">
<RadioButton
android:id="@+id/radioButton"
android:layout_width="match_parent"
android:layout_height="wrap_content"
android:text="monkey" />
<RadioButton
android:id="@+id/radioButton2"
android:layout_width="match_parent"
android:layout_height="wrap_content"
android:text="cat" />
<RadioButton
android:id="@+id/radioButton3"
android:layout_width="match_parent"
android:layout_height="wrap_content"
android:text="dog" />
</RadioGroup>
<Button
android:id="@+id/button3"
android:layout_width="match_parent"
android:layout_height="wrap_content"
android:text="정답 확인" />
</LinearLayout>
Ex02 Fragment.java & fragment_ex02.xml
Ex02Fragment.java
package org.techtown.project6;

import android.app.AlertDialog;
import android.os.Bundle;
import android.view.LayoutInflater;
import android.view.View;
import android.view.ViewGroup;
import android.widget.Button;
import android.widget.RadioButton;
import android.widget.RadioGroup;

import androidx.fragment.app.Fragment;


public class Ex02Fragment extends Fragment {

    @Override
    public View onCreateView(LayoutInflater inflater, ViewGroup container,
                             Bundle savedInstanceState) {
        ViewGroup rootView=(ViewGroup)inflater.inflate(R.layout.fragment_ex02,container,false);
        RadioGroup radioGroup2=rootView.findViewById(R.id.radiogroup2);
        RadioButton radioButton4=rootView.findViewById(R.id.radioButton4);
        RadioButton radioButton5=rootView.findViewById(R.id.radioButton5);
        RadioButton radioButton6=rootView.findViewById(R.id.radioButton6);

        Button button4=rootView.findViewById(R.id.button4);
        button4.setOnClickListener(new View.OnClickListener() {
            @Override
            public void onClick(View v) {
                boolean ex2=radioButton6.isChecked();
                if(ex2==true){
                    AlertDialog.Builder dialog=new AlertDialog.Builder(getActivity());
                    dialog.setTitle("정답 확인");
                    dialog.setMessage("축하합니다! 맞았습니다! 다음 문제에 도전하세요!");
                    dialog.setIcon(R.mipmap.ic_launcher);
                    dialog.setNeutralButton("닫기",null);
                    dialog.show();
                }
                else{
                    AlertDialog.Builder dialog=new AlertDialog.Builder(getActivity());
                    dialog.setTitle("정답 확인");
                    dialog.setMessage("아..이걸 틀리다니..이건 좀..심한데요?"+"\n"+"공부 열심히 해야겠어요!");
                    dialog.setIcon(R.mipmap.ic_launcher);
                    dialog.setNeutralButton("닫기",null);
                    dialog.show();
                }
            }
        });
        return rootView;
    }

}
fragment_ex02.xml
<?xml version="1.0" encoding="utf-8"?>
<LinearLayout xmlns:android="http://schemas.android.com/apk/res/android"
    xmlns:tools="http://schemas.android.com/tools"
    android:layout_width="match_parent"
    android:layout_height="match_parent"
    android:orientation="vertical"
    tools:context=".Ex01Fragment" >

    <TextView
        android:id="@+id/textView5"
        android:layout_width="match_parent"
        android:layout_height="wrap_content"
        android:layout_marginTop="150dp"
        android:text="Question2"
        android:textSize="30sp" />

    <TextView
        android:id="@+id/textView6"
        android:layout_width="match_parent"
        android:layout_height="wrap_content"
        android:text="다음중 가장 큰 숫자를 고르시오."
        android:textSize="25sp" />

    <RadioGroup
        android:id="@+id/radiogroup2"
        android:layout_width="match_parent"
        android:layout_height="wrap_content">

        <RadioButton
            android:id="@+id/radioButton4"
            android:layout_width="match_parent"
            android:layout_height="wrap_content"
            android:text="one" />

        <RadioButton
            android:id="@+id/radioButton5"
            android:layout_width="match_parent"
            android:layout_height="wrap_content"
            android:text="twenty two" />

        <RadioButton
            android:id="@+id/radioButton6"
            android:layout_width="match_parent"
            android:layout_height="wrap_content"
            android:text="one hundred" />
    </RadioGroup>

    <Button
        android:id="@+id/button4"
        android:layout_width="match_parent"
        android:layout_height="wrap_content"
        android:text="정답 확인" />

</LinearLayout>
Ex03 Fragment.java & fragment_ex03.xml
Ex03Fragment.java
package org.techtown.project6;

import android.app.AlertDialog;
import android.os.Bundle;
import android.view.LayoutInflater;
import android.view.View;
import android.view.ViewGroup;
import android.widget.Button;
import android.widget.RadioButton;
import android.widget.RadioGroup;

import androidx.fragment.app.Fragment;


public class Ex03Fragment extends Fragment {

    @Override
    public View onCreateView(LayoutInflater inflater, ViewGroup container,
                             Bundle savedInstanceState) {
        ViewGroup rootView=(ViewGroup)inflater.inflate(R.layout.fragment_ex03,container,false);
        RadioGroup radioGroup3=rootView.findViewById(R.id.radiogroup3);
        RadioButton radioButton10=rootView.findViewById(R.id.radioButton10);
        RadioButton radioButton11=rootView.findViewById(R.id.radioButton11);
        RadioButton radioButton12=rootView.findViewById(R.id.radioButton12);

        Button button5=rootView.findViewById(R.id.button5);
        button5.setOnClickListener(new View.OnClickListener() {
            @Override
            public void onClick(View v) {
                boolean ex3=radioButton10.isChecked();
                if(ex3==true){
                    AlertDialog.Builder dialog=new AlertDialog.Builder(getActivity());
                    dialog.setTitle("정답 확인");
                    dialog.setMessage("축하합니다! 맞았습니다! 다음 문제에 도전하세요!");
                    dialog.setIcon(R.mipmap.ic_launcher);
                    dialog.setNeutralButton("닫기",null);
                    dialog.show();
                }
                else{
                    AlertDialog.Builder dialog=new AlertDialog.Builder(getActivity());
                    dialog.setTitle("정답 확인");
                    dialog.setMessage("아..이걸 틀리다니..이건 좀..심한데요?"+"\n"+"공부 열심히 해야겠어요!");
                    dialog.setIcon(R.mipmap.ic_launcher);
                    dialog.setNeutralButton("닫기",null);
                    dialog.show();
                }
            }
        });
        return rootView;
    }

}
fragment_ex03.xml
<?xml version="1.0" encoding="utf-8"?>
<LinearLayout xmlns:android="http://schemas.android.com/apk/res/android"
    xmlns:tools="http://schemas.android.com/tools"
    android:layout_width="match_parent"
    android:layout_height="match_parent"
    android:orientation="vertical"
    tools:context=".Ex01Fragment" >

    <TextView
        android:id="@+id/textView9"
        android:layout_width="match_parent"
        android:layout_height="wrap_content"
        android:layout_marginTop="150dp"
        android:text="Question3"
        android:textSize="30sp" />

    <TextView
        android:id="@+id/textView10"
        android:layout_width="match_parent"
        android:layout_height="wrap_content"
        android:text="Ice Age에서 나오는 매머드의 이름은?"
        android:textSize="25sp" />

    <RadioGroup
        android:id="@+id/radiogroup3"
        android:layout_width="match_parent"
        android:layout_height="wrap_content">

        <RadioButton
            android:id="@+id/radioButton10"
            android:layout_width="match_parent"
            android:layout_height="wrap_content"
            android:text="Manny" />

        <RadioButton
            android:id="@+id/radioButton11"
            android:layout_width="match_parent"
            android:layout_height="wrap_content"
            android:text="Jonny" />

        <RadioButton
            android:id="@+id/radioButton12"
            android:layout_width="match_parent"
            android:layout_height="wrap_content"
            android:text="Anny" />
    </RadioGroup>

    <Button
        android:id="@+id/button5"
        android:layout_width="match_parent"
        android:layout_height="wrap_content"
        android:text="정답확인" />

</LinearLayout>
결과물


'(Android App)안드로이드 앱' 카테고리의 다른 글
| (Android App)안드로이드 스튜디오: 뷰페이저2, Viewpager2 기초 (0) | 2021.02.23 |
|---|---|
| (Android App)안드로이드 스튜디오:Dialog/다이얼로그/알림 대화상자 보여주기. (0) | 2021.02.20 |
| (Android App)안드로이드 스튜디오: 시크바와 프로그레스바 (0) | 2021.02.18 |
| (Android App)안드로이드 스튜디오:데이터 연동없이 간단한 회원가입,로그인 프로그램 만들기/getExtra,putExtra 활용. (0) | 2021.02.17 |
| (Android App)안드로이드 스튜디오: 맥북/M1 - 토스트 메시지 위치 안바뀜 (0) | 2021.02.14 |


댓글